How Do Landlords Sign Up for Azibo?
Managing rental properties can be a rewarding investment, but it often comes with a significant administrative burden.
From collecting rent to tracking expenses, landlords are tasked with juggling numerous responsibilities. That’s where Azibo steps in—a free, all-in-one platform designed specifically for rental property owners to simplify and streamline property management.
In this article, we’ll walk you through how easy it is to sign up for Azibo and start taking advantage of its powerful features. Whether you’re managing one property or an entire portfolio, Azibo helps you save time, reduce costs, and improve the experience for you and your tenants.
What is Azibo?
Azibo is an all-in-one financial and property management platform designed specifically for rental property owners, managers, and their tenants. We empower property owners to save time, reduce costs, and simplify operations with a comprehensive suite of free tools and features.
From automated rent collection with no transaction fees to full-service accounting and banking tailored to real estate investors, Azibo streamlines every aspect of managing rental properties.
Tenants also benefit from Azibo through convenient payment options, rent reminders, and credit-building opportunities.
With innovative features like customizable automatic late fees, secure document storage, and integrated maintenance tracking, Azibo ensures seamless collaboration between property owners and renters. Trusted by landlords and property managers nationwide, Azibo delivers transparency, financial flexibility, and unparalleled efficiency to make real estate investing easier and more profitable.
Is Azibo really free for landlords?
Yes, Azibo is truly free for landlords. Unlike other property management platforms, Azibo provides a comprehensive suite of tools without monthly subscription fees or hidden costs. Features like automated rent collection, customizable late fees, secure document storage, maintenance tracking, and full-service accounting are available at no cost to property owners and managers.
Even advanced capabilities, such as collecting security deposits and managing one-time payments, come without fees for landlords. Additionally, landlords can take advantage of Azibo’s integrated banking features, which offer free ACH transfers and no monthly service fees.
By eliminating the financial barriers of traditional property management software, Azibo empowers landlords to maximize their profitability and streamline operations—all while delivering exceptional service to tenants. This transparency and cost efficiency make Azibo a truly game-changing platform for rental property owners.
Learn more about the Azibo business model here.
How do landlords sign up for Azibo?
Signing up for Azibo is quick, easy, and designed to get you up and running in minutes. Here’s how you can start managing your rental properties effortlessly:
Step 1: Create your free Azibo account
To create an account with Azibo, visit the Azibo homepage and click “Get started” or “Sign up.”
That takes you to the Azibo signup page, where you can complete the form with your name, phone number, email address, and password. Click ‘create my free landlord account’
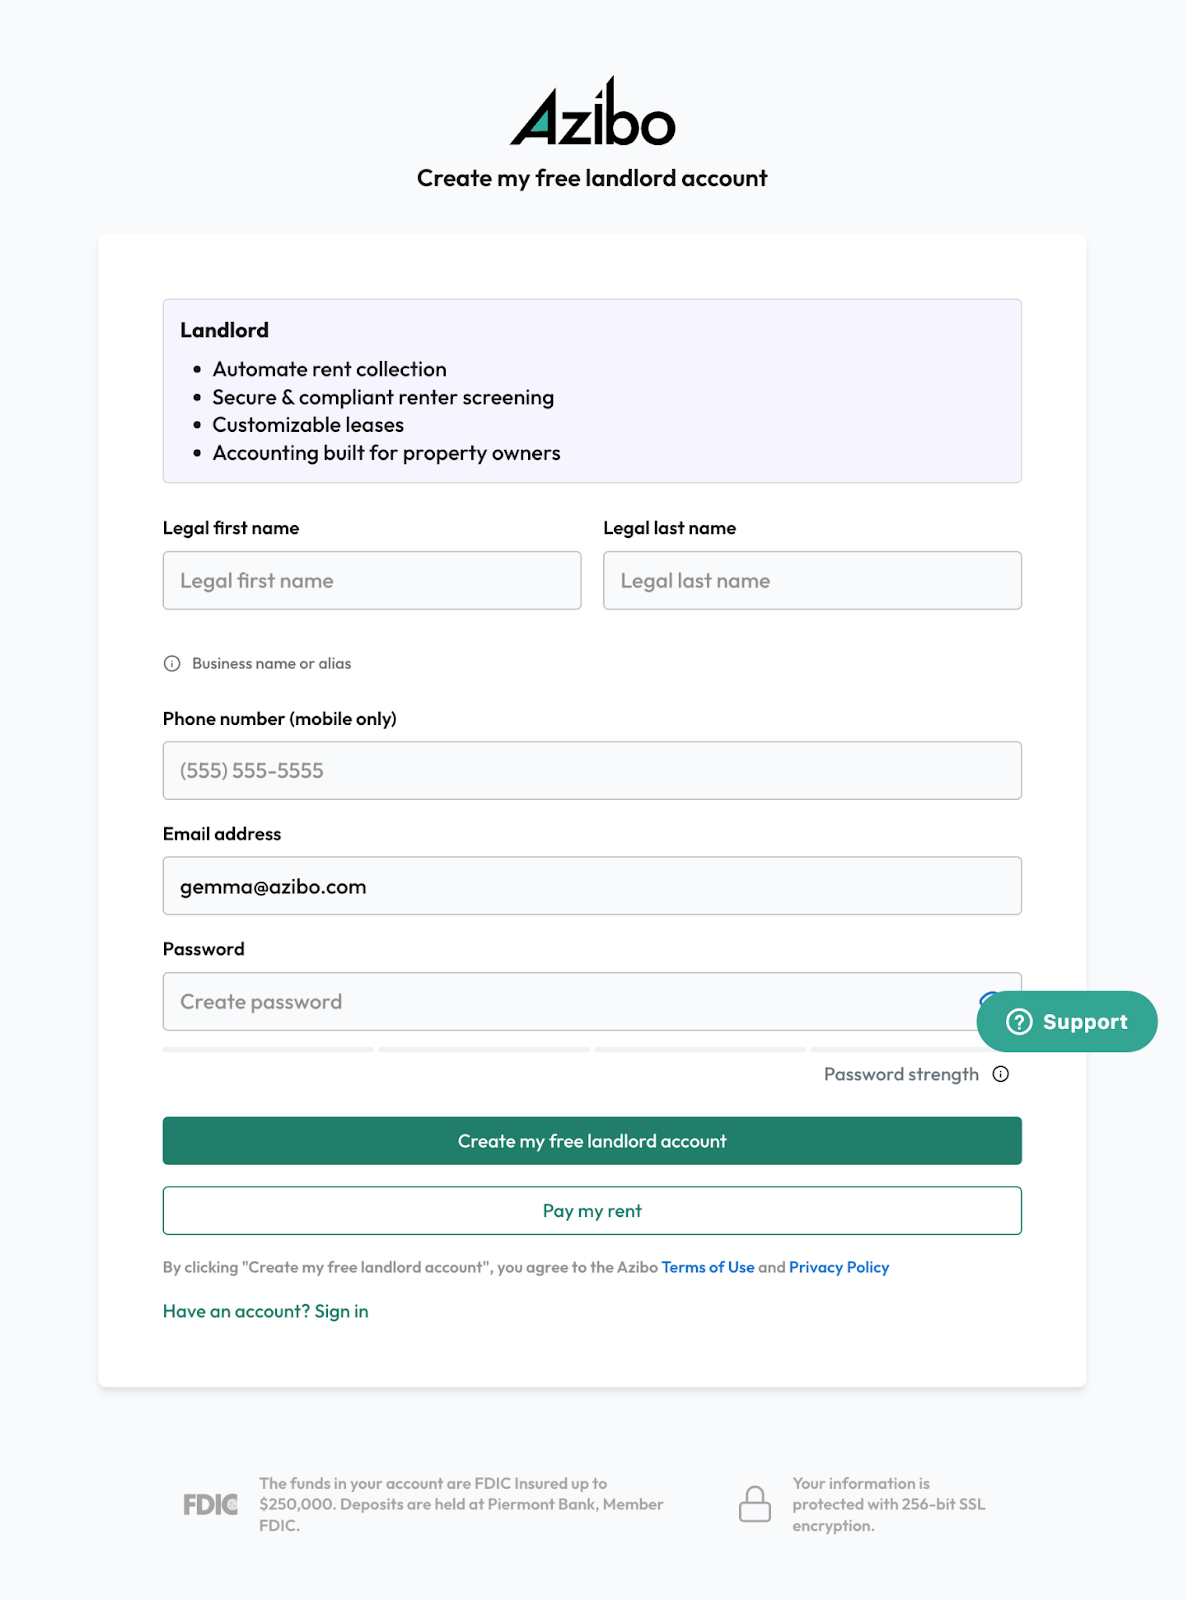
Be sure to include a phone number where you can receive text messages, as this will be necessary to verify your account. Once you create your account, we’ll verify your phone number by sending you a verification code. After you verify your phone number, you’ll be redirected to sign in to your new Azibo account.

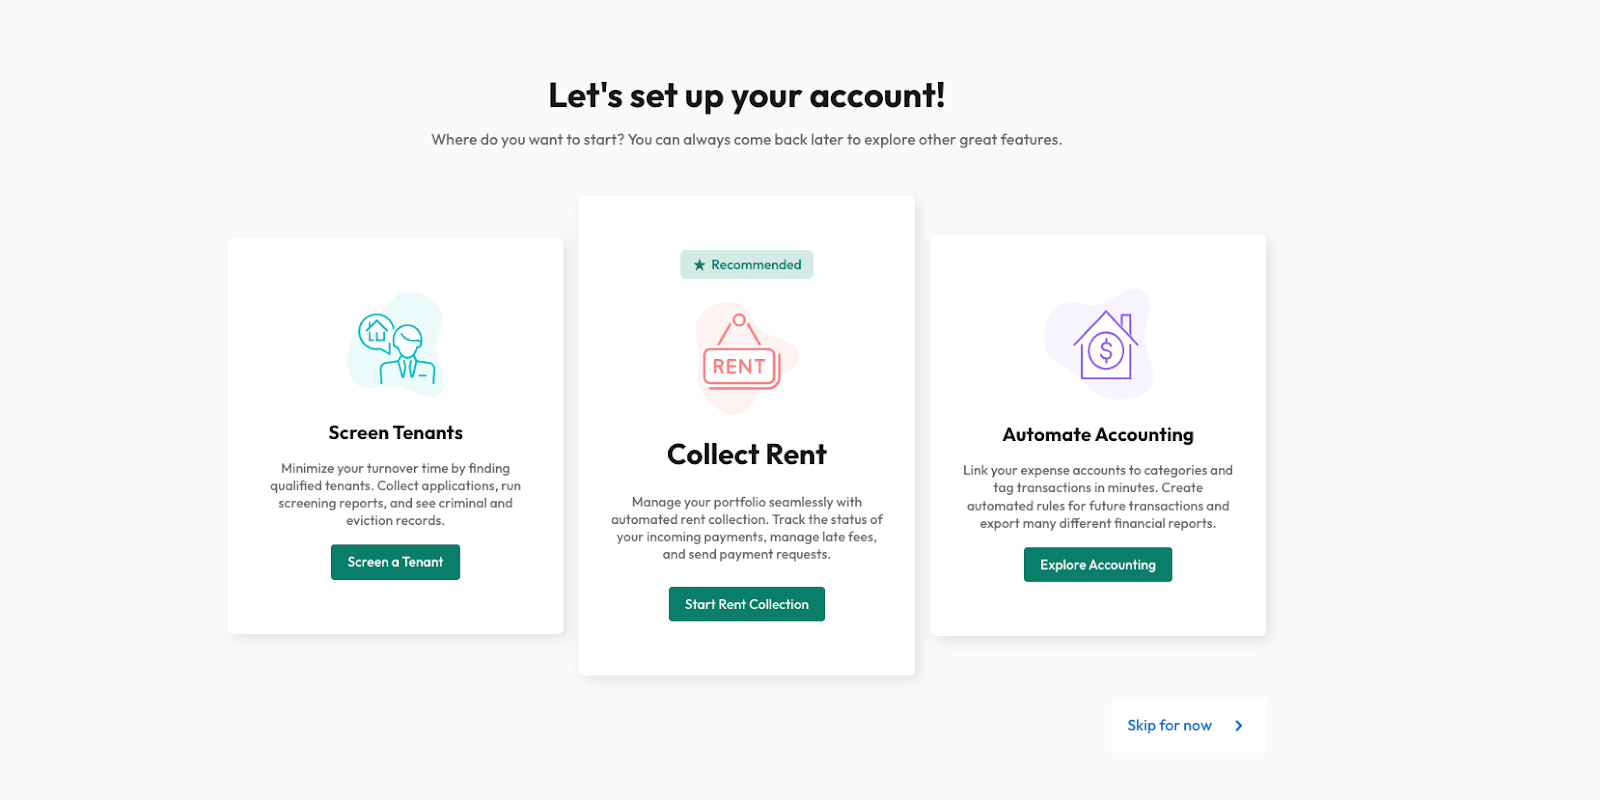
Step 2: Choose your Azibo services
Once you sign in, we’ll ask how many properties you own to provide a more customized onboarding experience.

Next, you’ll see a page featuring some of Azibo services that are available to landlords. Select all that apply to you. Don’t worry — all these features will be available to you later, too. You can set up additional services from your Azibo dashboard at any time.
Step 3: Set up online rent collection
Rent collection is always a great place to start in your new account. Once you choose “collect rent,” you’ll be directed to a new page with the three steps required to set up online rent collection.
First, click “Add property” to add your rental property to Azibo.
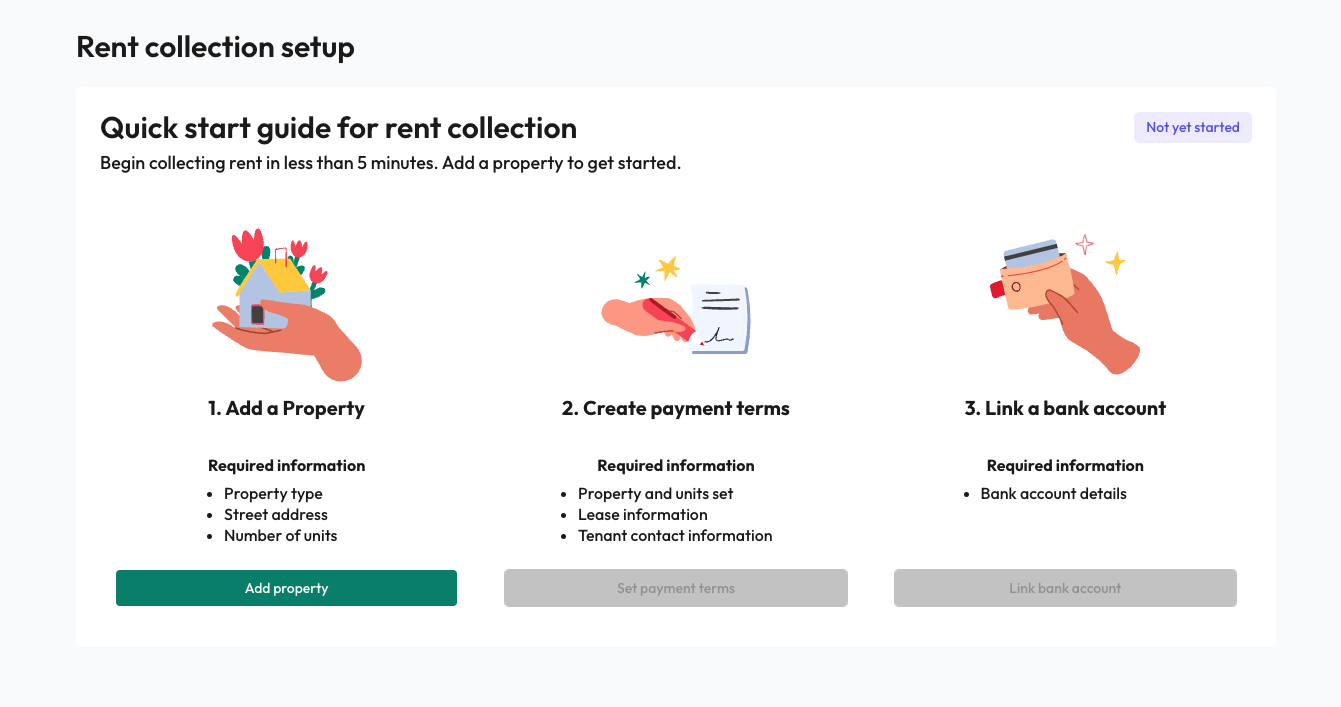
Step 3a: Add a property
Next, search or enter your property address, add the property type, the number of total units at that address, and the unit number you'd like to start collecting rent for. Click save property.
On the next screen, select the right property and unit, and click continue.
You'll then be prompted to enter how you'd like to manage the lease for this unit. Currently, we do not support creating leases within Azibo as we work on refining our process to bring you better tools. Click ‘skip lease set up’
*Note: You can add additional properties from the Properties page on your Azibo dashboard at any time.
Step 4: Create payment terms and add tenants
Now it’s time to add the payment terms you will use for your rental property and invite tenants.

On this screen, you’ll set up the payment terms for your lease. Here’s how to complete each section:
- Payment frequency:
- Select whether the lease is month-to-month or fixed term (6 months, yearly, 2 years).
- If choosing a fixed term, you can enable automatic renewal on a month-to-month basis after the term ends.
- Lease dates:
- Enter the start date of the lease.
- For fixed-term leases, enter the end date or select a preset duration (+6 months, +1 year, or +2 years).
- Rent details:
- Choose the rent due date (e.g., “1st of the month”).
- Input the monthly rent amount for this lease.
- Additional options:
- Toggle additional settings to match your lease terms:some text
- Late fees: Enable to apply penalties for late rent payments.
- Enable partial payments: Allow tenants to make partial rent payments if necessary.
- Security deposit: Turn on if collecting a deposit as part of the lease.
- Prorate first month’s rent: Enable if the first month’s rent is partial based on the move-in date.
- Prorate last month’s rent: Enable if the final month’s rent is prorated for a partial move-out month.
- Renters insurance:
- By default, tenants are notified that renters insurance is preferred.
- To require renters insurance, check the Insurance required for tenants box.
Pro Tip: Tenants can easily purchase renters insurance through their Azibo account.
6. Finalize setup:
- Review the information and click Continue to proceed.
Note: You can return to this screen to make edits at any time from your Azibo dashboard.
Step 5: Add tenant details
Next, you need to add tenants. Include their full name, contact information, email address, and phone number. An invite to pay rent on Azibo box is automatically checked. We have also included an example of the email that will be sent to your renters once invited if you receive any questions from them.
On this screen, you can add additional renters, although we currently only support rent collection from one renter account.

Once you hit continue, you can review and confirm that all details are correct. Click confirm and invite.
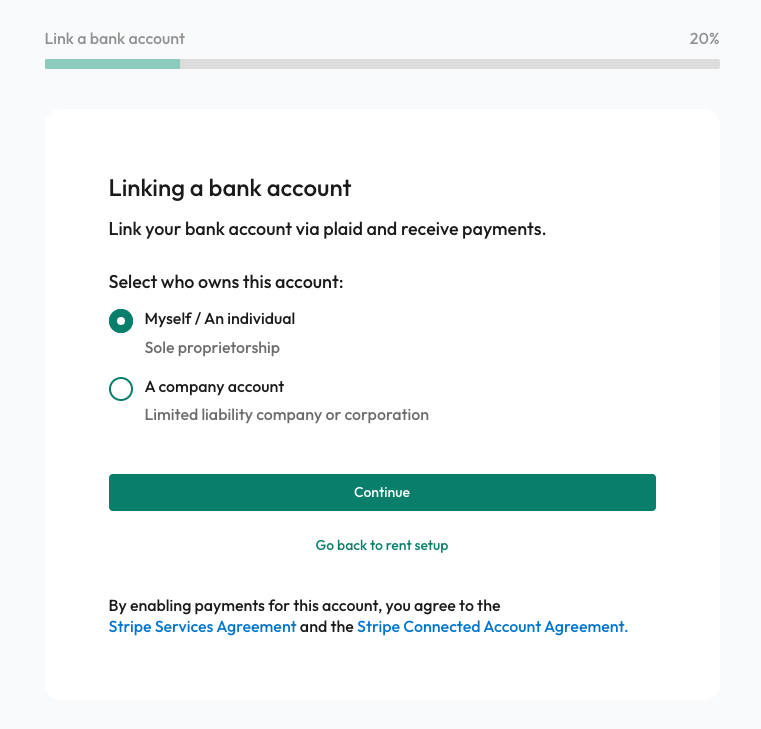
Step 6: Link a bank account
Next, link the bank account you will use for your rental property.
First, to securely link your existing bank to your Azibo account, answer a few questions about how you use this bank account for your rental business.
Next, fill in your personal information, including your full name, birthday, last four digits of your Social Security number, and primary address.
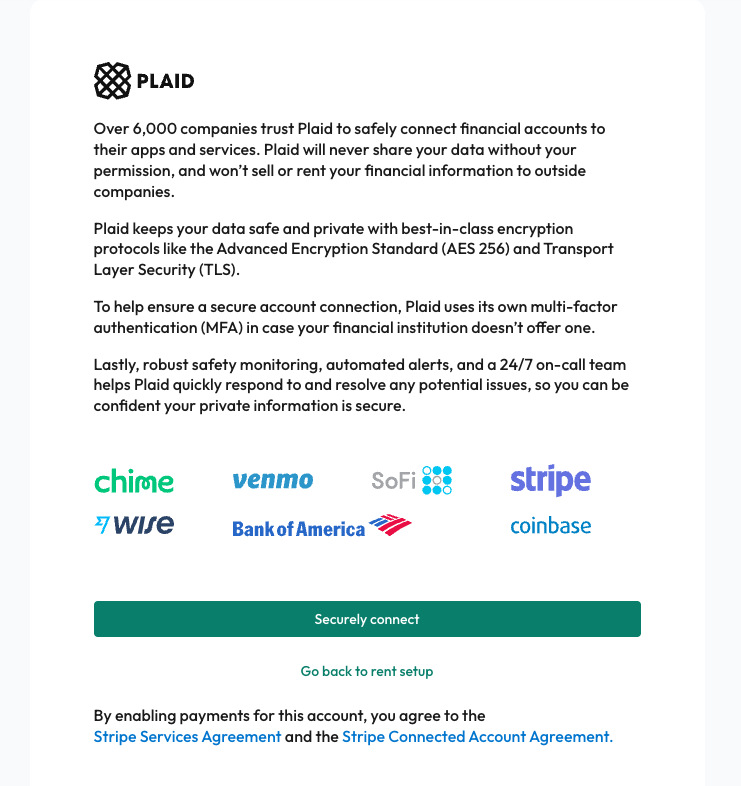
Then, go through the guided setup process to link your bank account. We partner with Plaid — the secure payments platform used by companies like Amazon, DocuSign, and Lyft — to protect your information.
Through Plaid, you can choose your bank and enter your bank credentials to link the account securely. Rest assured that this information will never be shared or sold.
Last but not least, make sure you provide a government-issued photo ID to verify your identity. This ensures you get paid your rental income.
Congratulations! You’re ready to go
You’ve successfully set up your Azibo account and can now start collecting rent online. You can also check your Azibo dashboard to track rent payment status, better understand your financial performance, carry out renter screening, collaborate with your team, and tag expenses to simplify tax prep.
Ready to open a free Azibo account?
Want to know what the Azibo experience looks like for your tenants? Read our blog post How Do Renters Sign Up for Azibo? for step-by-step instructions on the Azibo renter sign-up process.
What landlords are saying about Azibo
Don’t just take our word for it—here’s what other property owners have to say about using Azibo:
• “Azibo has been a tremendous help in managing my rental properties. It’s streamlined my processes, saved me time, and made rent collection hassle-free.”
— Steven Toth, real estate investor.
• “The platform is intuitive and easy to use. Azibo gives me peace of mind knowing that my rent payments and financial records are in one place.”
— Jua McMillan, landlord and entrepreneur.
• “I’ve tried other property management tools, but Azibo stands out. The features are tailored to landlords like me, and the support team is amazing.”
— Andrew & Camala Winter, landlords with growing portfolios.
Discover how Azibo can help you simplify property management and empower your business. Start your journey today!
Upping your property management game with Azibo!
Signing up for Azibo is just the beginning of transforming how you manage your rental properties. With Azibo, you’ll have access to tools that simplify rent collection, financial tracking, and tenant communication—all at no cost to you.
By automating time-consuming tasks and providing a seamless experience for landlords and tenants alike, Azibo empowers you to focus on growing your portfolio and achieving financial success.
Ready to get started? Join the thousands of landlords already benefiting from Azibo and discover how it can revolutionize your property management experience.
Sign up for free today!

Written by
Gemma Smith
Download Now: Master Rent Collection with Firmness and Empathy

Other related articles


Learn more about Azibo


